Moving from spreadsheets
Your spreadsheet becomes software your whole team works in: each sheet a list, its columns the details you keep, its rows the records. No more copies by email, and no more asking which version is current. This page shows what comes over and how, step by step.
What comes over
- Each sheet a list.
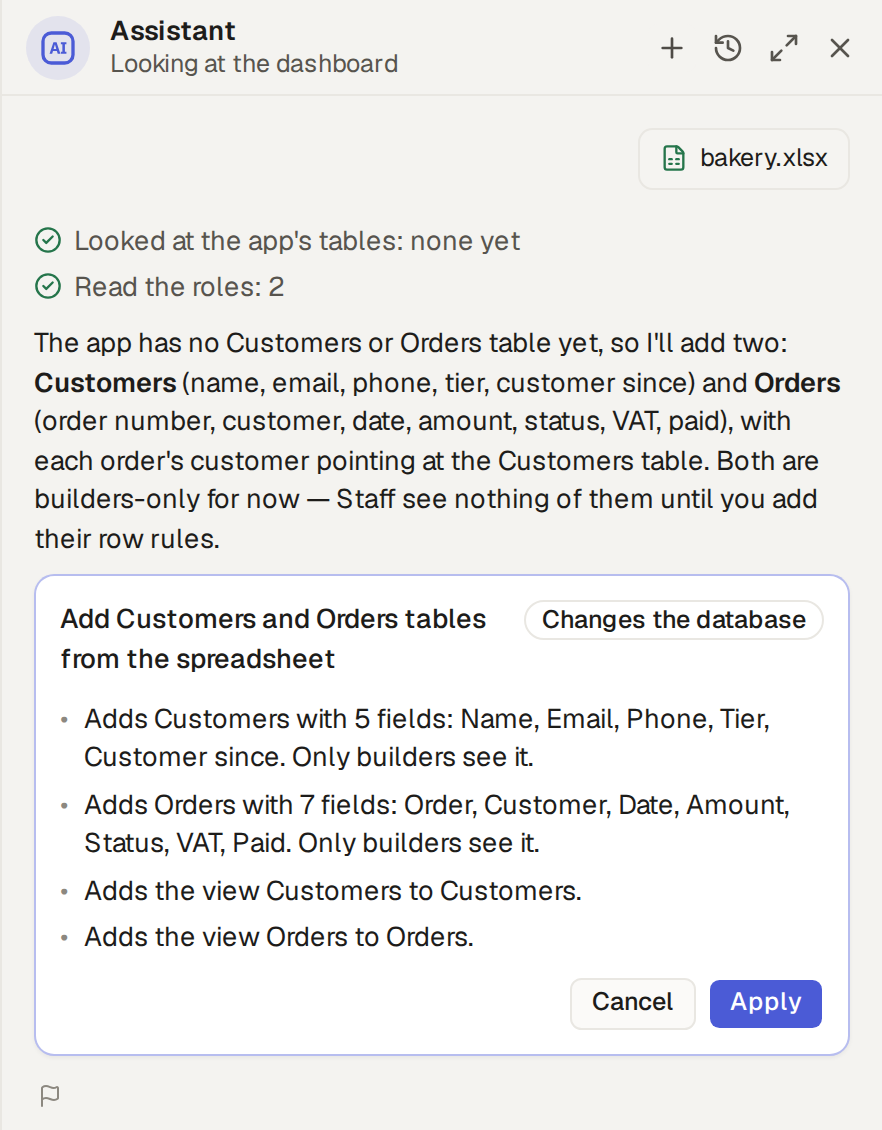
- A sheet that holds records becomes a list, named after the sheet. A sheet of notes or totals is left out; ours had a Notes sheet, and the assistant skipped it.
- Each column a field.
- The heading is the field’s name, and the values decide its kind: numbers, dates, yes or no, email addresses, text. A column of a few repeated words, a status or a tier, becomes a choice.
- Each row a record.
- Dates, amounts, choices and yes-or-no values come over as what they are, not as text.
- Links between sheets.
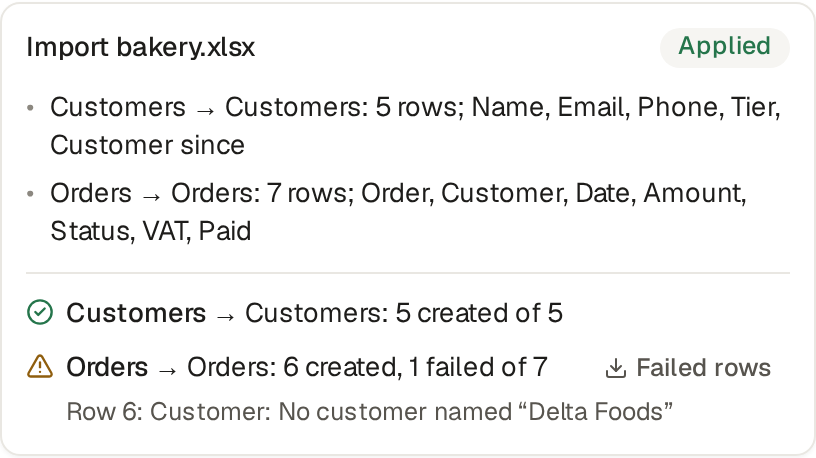
- A column whose values name rows of another sheet, a customer’s name on an order, becomes a link to that list. Each name must match a row of the other sheet, letter case aside.
Step by step
- 1Save your spreadsheet. As an Excel file (.xlsx), which keeps all its sheets in one file: Excel, Google Sheets, Numbers and LibreOffice can all save one. A CSV file works too, one sheet each.
- 2Open the assistant. In your base, as one of its builders, open the assistant at the top of any page.
- 3Drop the file in. Drag the file onto the assistant, or attach it with the paper clip, and send it. A word about what it holds helps, but is not needed.
- 4Read the card. The assistant reads each sheet’s headings and first rows and proposes the lists and their fields as one card. Nothing changes until you apply it.
- 5Apply it. The lists are created, as a new version of your base that you can go back to.
- 6Apply the import. A second card names, for each sheet, the list it goes into, its number of rows and its columns. Apply it, and the rows come in.
- 7Read the report. The card says how many rows of each sheet came in, and lists the ones that did not, with the reason. The Failed rows button downloads them as a file to fix.
Adding rows later
- Import into a list.
- In each list, the users who may add to it find Import in the … menu. Choose a CSV or Excel file, one record per row. The columns whose headings match a field are matched for you and the others skipped; change any with the menu above its column, then import.
- The same report.
- What did not come in is listed with its row and its reason, such as an invalid option for a status the list does not have, and Failed rows downloads it. Fix those rows in your workbook and import them again; for a sheet without dates, fixing the downloaded file and importing it works too.
What does not come over
- Formulas.
- The value a formula shows comes over, not the formula. Ask the assistant for a field that works it out: our VAT column became 19% of Amount, kept up to date on every order.
- Formatting.
- Colours, fonts, column widths and number formats stay behind. Dates and amounts come over as values.
- Charts and comments.
- Neither comes over. Totals and charts are things to ask the assistant for once your data is in.
- Who sees what.
- A new list is seen only by your base’s builders until you say who else sees it. Ask the assistant: “Sales see only their own orders.”
A sheet that is not a plain table
- One row of headings.
- At the top of the sheet: no title above it, no second row of headings under it, no merged cells.
- One record per row.
- No blank rows between groups, and no totals or notes under the records. Put two tables on two sheets.
- One kind of value per column.
- In a date column, a row that says “soon” is reported rather than imported. Dates written as text are read as 2026-09-29, or in the date format of your own settings (Settings, Appearance).
Tidied that way, every row that fits comes in, and the report names the rest.