Get started with Base Captain
Try an app with no sign-up, sign up, create your base from an app, take the tour, find your way around, add your first item and use the keyboard shortcuts.
To start with Base Captain, try an app or sign up, create your base from an app, and add your first item. The examples on these pages come from an example shop, with its Customers, Orders and Products, and three people: an admin who builds the base, a manager and a salesperson. The example shop holds more than a base made from the Online shop app, so not every example is in such a base.
Each app on this site (Apps) has Try it free on its page, under Try it. It makes a base from the app for you, with no sign-up:
- Open the app's page, such as Accounting practice.
- Click Try it free. After a short wait, your base opens, signed in, with the app's sample data, its sample chats and the add-ons the app has by default, and the assistant open with a first message that names the app. You pick nothing.
The base is a temporary base: change anything in it for 24 hours, and keep it as a base of yours (Make a temporary base with no sign-up). If you are signed in, Try it free opens Create your base with the app and its add-ons picked (Create your base).
Anyone may sign up for Base Captain with an email and a code we mail. Signing up makes you a user of Base Captain. Then you create your base, on the Free plan, free for 30 days, at once and with no payment method (What the Free plan includes).
Start free on the Pricing page leads to Create your base, at www.basecaptain.com: when you are not signed in, the Base Captain sign-in page opens first.
- Enter your Email and click Continue. When no user has the address, we mail you a six-digit code at once, and the page asks for it.
- Enter the code on the page. The mail's subject is "Your Base Captain code: 042137", and it says "Enter 042137 to sign up for Base Captain." The code is in the subject, so your mail app's list shows it.
- Enter Your name and, if you like, a Password of at least 8 characters. You are signed in, and Create your base opens (Create your base).
Limits and details
- The sign-up code works once, for 15 minutes; after a minute you can ask for a new one.
- With no password, you sign in with a code we mail you, or with Google or Microsoft.
- If a user has the address already, the page signs you in instead (Sign in to your base).
- A person invited into a base signs up with no payment method and creates no base: they join the one that invited them (Join a base from an invitation).
- To try Base Captain with no sign-up, make a temporary base (Make a temporary base with no sign-up).
Create your base is one form at www.basecaptain.com that makes your base in one step, on the Free plan. Your base holds your work, your users and your plan (Create, copy, export and delete a base). Create it once you have signed up, or later: sign in at www.basecaptain.com, which opens Create your base until you have one.
- Enter its Base name, such as "Acme Ltd". A base's name cannot contain @.
- Say in What does your business do? what the business does, and click Recommend an app (Let the assistant recommend an app), which shows once the box has text. Start from and Create my base show once the recommendation has answered; coming from an app's page, at once, with its app chosen. From an app's page, while the box is empty, Recommended app says "Describe your business first."
- Under Start from, pick one: Recommended app, Choose an app, such as Hair salon, or one of your own, or Empty base, which you build with the assistant. An app is chosen in a box: search for it and click it, and the box closes. The page shows the app with Change, which opens the box again, and its add-ons, such as "Add-ons: none", with Customize, which opens a box such as Customize Hair salon: tick the add-ons you want (Pick the add-ons that change an app) and click Done.
- Click Create my base. Your base is made at once, with no payment method and no payment, and a message says it is created and on the Free plan. It opens with you signed in as its admin, with the app's sample data, its dates around today, which you delete in one step when you are ready (Delete all data).
Limits and details
- The Free plan has every feature, with 250 MB of storage. Your base works with the people in it until an owner adds a payment method, with no charge: then it mails your customers, publishes forms and links and takes payments (What the Free plan includes).
- After 30 days the base becomes read-only, and 30 days later its data is deleted, unless an owner upgrades to Pro (When the Free plan ends).
- For the Pro plan, 29 a month, an owner clicks Upgrade to Pro in the base's Settings, Plan, at any time (Upgrade to the Pro plan).
- When you reached the free bases one person may have, Create your base says so and makes no base: upgrade one of your bases to Pro, or delete one, first.
Recommend an app, on Create your base, has the assistant pick the app and add-ons your base starts from, from what the business does (Start from an app and add or remove modules).
- Say in a few sentences what the business does, such as "We run a hair salon; three stylists work on commission.", and click Recommend an app.
- The assistant picks the app to start from, such as Hair salon, and Recommended app shows it with a sentence on why, picked. Under it are its add-ons: only those that your description asks for are ticked, such as Commission.
- To leave an add-on out, click Customize, untick the add-on and click Done: the base is made without it. The recommended app itself has no Change.
- Click Create my base. The base is made from the app and the add-ons still ticked, with their sample data.
When you are ready for your own data, the owner deletes all data in one step in Settings, General, or asks the assistant: every item goes, the tables and settings stay (Delete all data).
Limits and details
- Recommended app is off until there is a recommendation for what you wrote, and it says why: there is no text yet, you changed the text since, no app fits it, or the recommendation is not available now. Then pick Choose an app or Empty base, or click Recommend an app again.
- What the business does becomes its About this base, in Settings, General, and its assistant and agents know it.
- The recommendation uses a little of the AI of the base you create. One person gets a limited number of recommendations in 24 hours; past it, Recommended app says "You asked for many recommendations in the last 24 hours. Choose an app, or try again tomorrow."
The tour of a base opens the assistant's panel the first time you open a base where the tour is on, and shows what you may reach there, so a new user finds their way alone. A new base has the tour off: an admin turns it on in Settings, General, to give each user the tour. Each step is a short message:
- The base's name, and what it is for: the first sentence of what its admins wrote about the business.
- One sentence on what you may do in the base.
- A card for each of the first five lists in the sidebar of App: what the list holds, what you may do there, and a button, such as "New order". Then one card naming the rest.
- The Inbox and Chat, then Builder and Activity, those your rail shows; Modules, for those who build the base, and Payments, for an admin of a base that takes payments; then Settings.
- The keys: press ? on any page to see them (Use the keyboard shortcuts). This step does not show on a device with a touch screen and no keyboard.
- History, the list of the parts of your conversation with the assistant, then the assistant, last.
Each step of the tour opens its page and rings the part it speaks of. Under the last message, Back, Next step and Done move you through it.
At any step of the tour, type a question in the assistant's box, such as "What do I do with an unpaid order?". The assistant answers about the step you are on, and may open another page to show you; Next step takes you back to the tour (Ask the assistant and review its changes).
On a screen narrower than 1280 pixels, such as a phone, the tour's panel covers the page: Next step shows the next step's text, and Show me closes the panel on the step's page with its ring. Back to the tour (on a phone, Tour), at the top, opens it again on the same step.
Done, or closing the panel, ends the tour, and the tour does not come back by itself. To see it again, click your picture at the bottom of the rail, then Show me around.
Limits and details
- The tour shows only what your role may reach: a salesperson gets only the lists a salesperson may open, and only the users who build the base see Builder.
- The steps are not kept in the assistant's history, and they use no AI: only a question does.
- Each base has its own tour: a user of two bases sees two.
- Your customers, in their portal, get the tour alone, in a panel titled Tour, with no box for a question and without the sentence about the base (Open a customer portal).
- When you see the base as a user sees it, the tour is that user's, and it counts as seen for neither of you (See the base as a user sees it).
- A base with no lists yet asks someone who builds it what the base is for, with the assistant's starts, and tells everyone else it has nothing for them yet.
- With the switch off, the tour is off for everyone, and Show me around goes with it. The tour's first sentence is the first sentence of what you wrote about the business there; a list's description is on its table's General page (Describe a table in one line under its list).
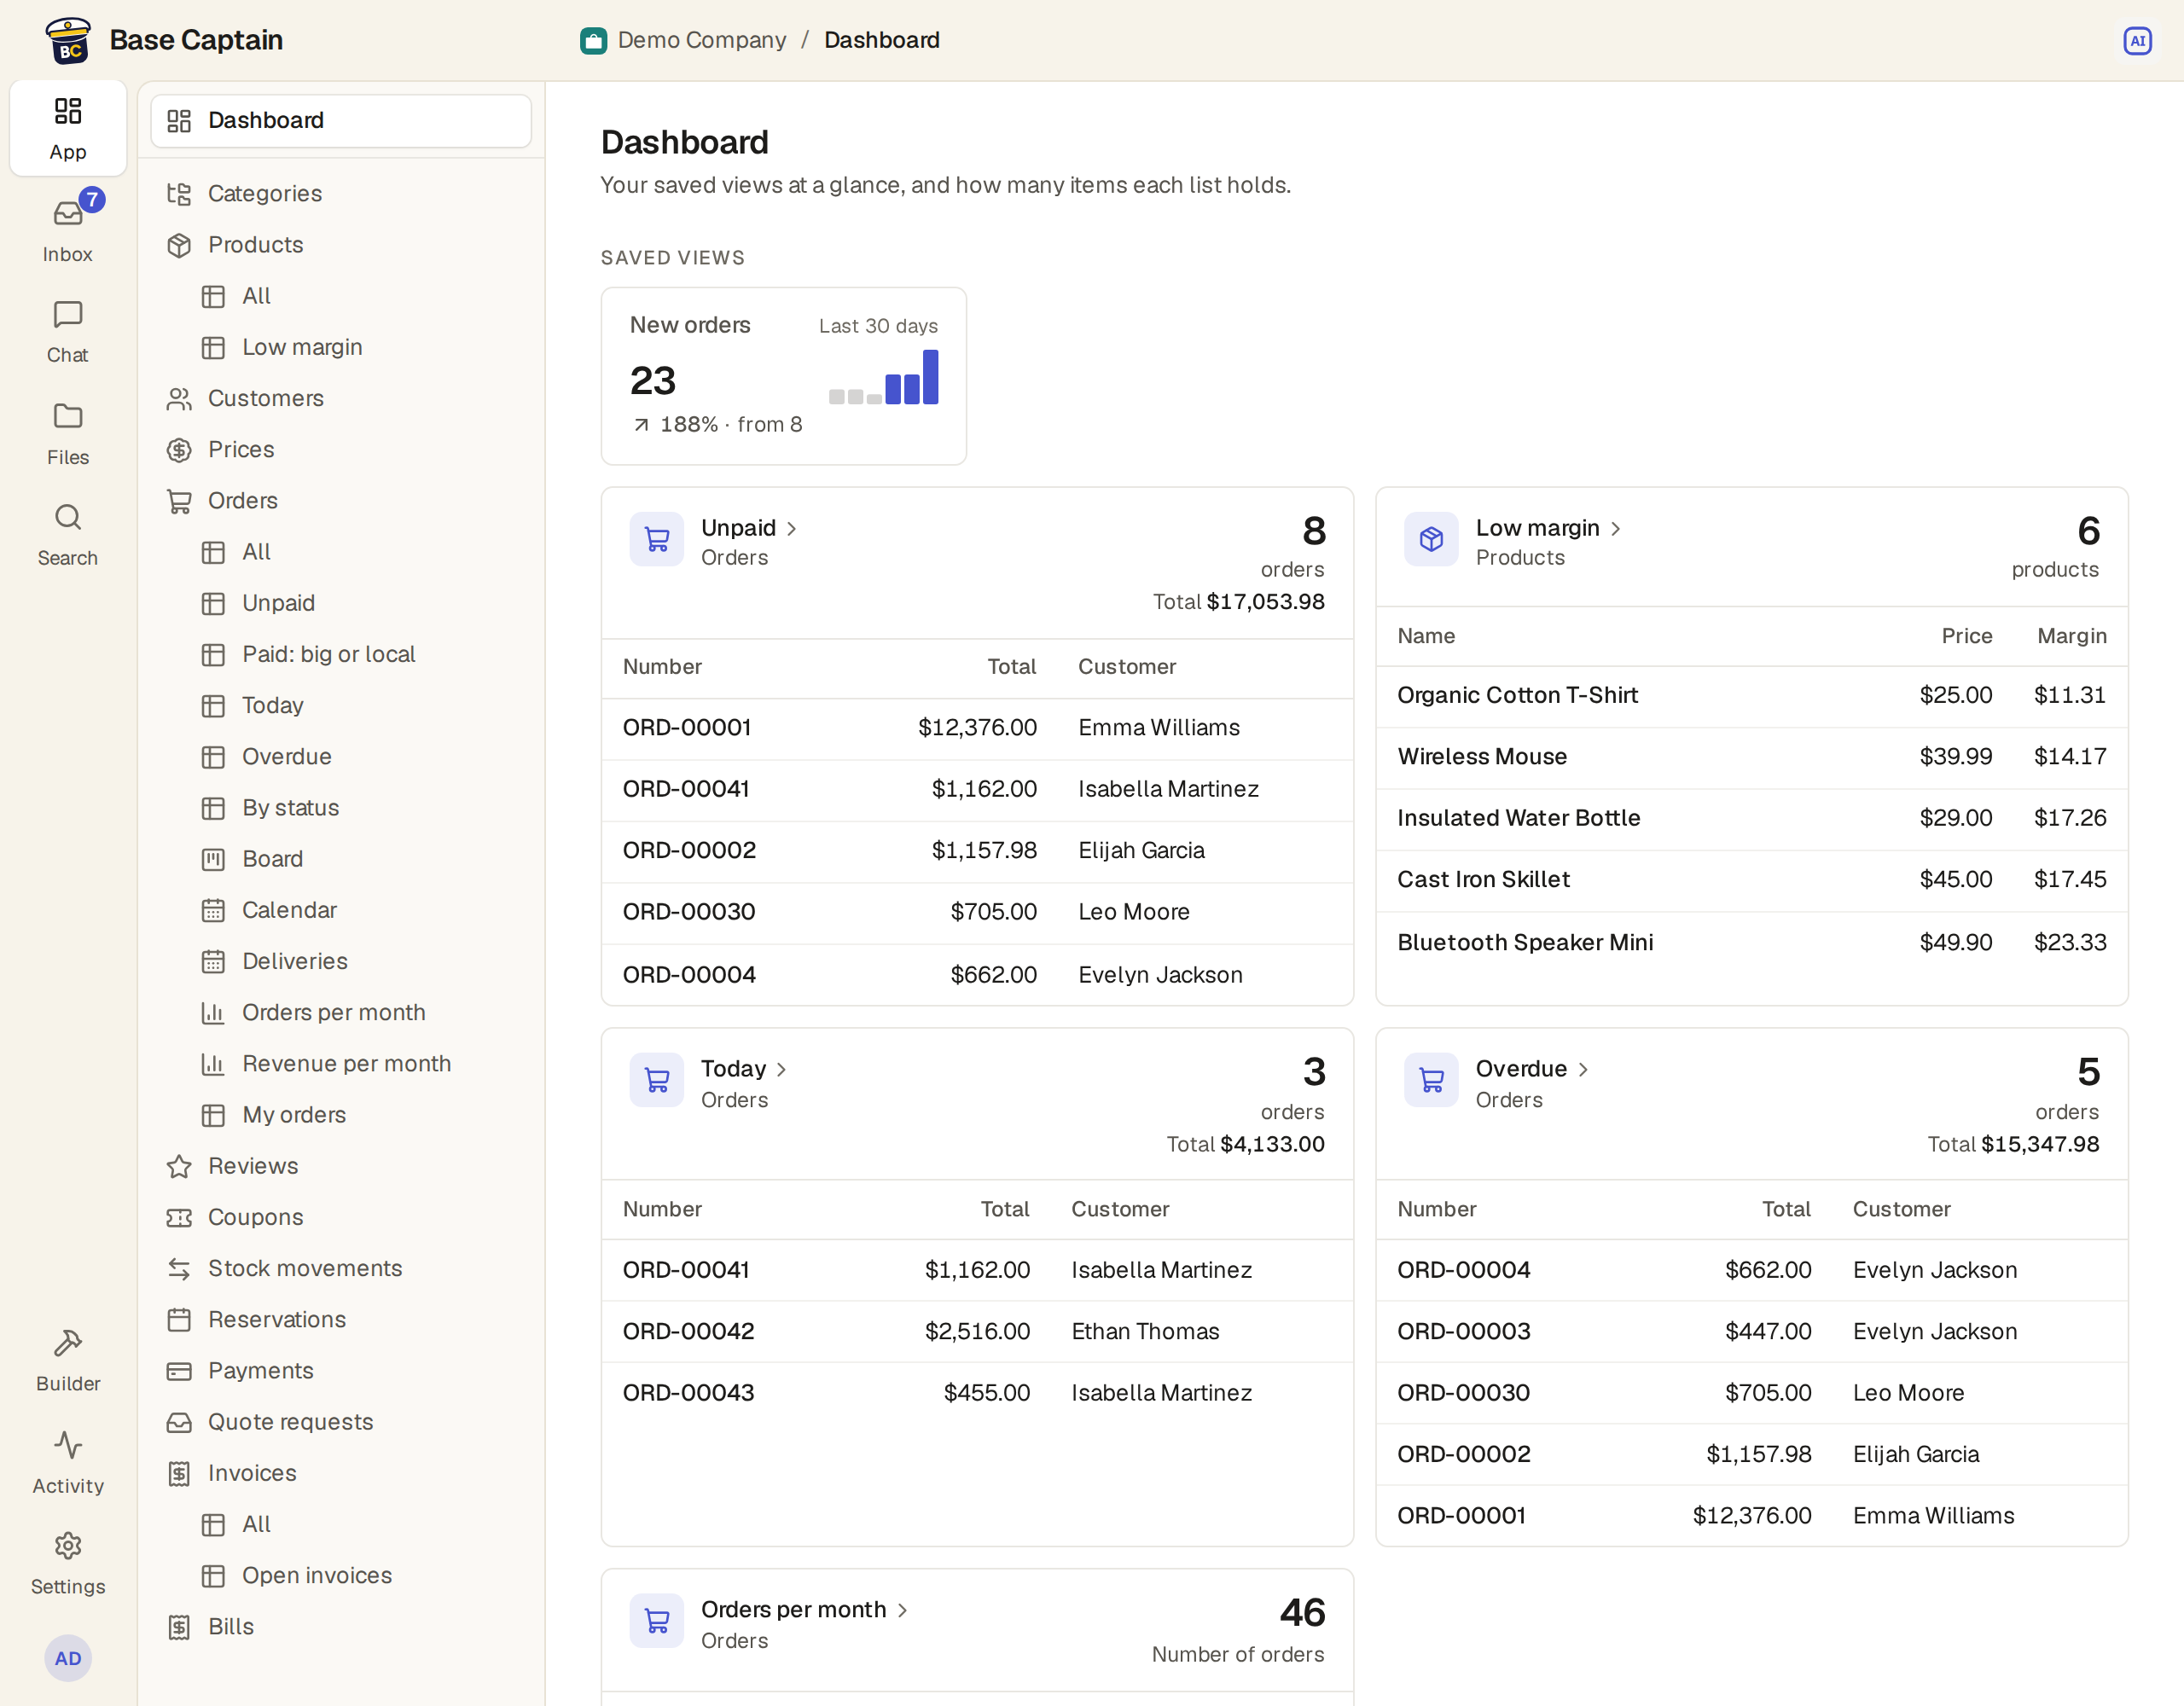
A base's rail, the narrow strip at the far left, holds the parts of the base. The sidebar beside the rail, under the path along the top, shows the menu of the part you opened. At the top of the rail:
- The Base Captain logo, which takes you to the Dashboard.
- App, the apps of your base together: its sidebar holds the Dashboard, the first page, with your saved views at a glance and how many items each list holds, and under it the base's views. Each view is a list of one table's items, as a grid, a board, a calendar or a chart. A table with one view is one row, as Categories and Customers are in the shop. A table with several shows its name as a label, with its views always listed under it: under Orders, the views All, Unpaid, “Paid: big or local”, Today, Overdue, By status, Board, Calendar, Deliveries, Orders per month, Revenue per month and My orders. You see the views your role may see, so the salesperson has no Stock movements. The lines of an order or an invoice are not there: you read them on their order or invoice.
- Inbox: the work that needs you, your notifications (See everything open for you in the Inbox) and the open mail sent to the base's address (Get and answer mail in a shared inbox), with the count of everything you must do. A notification or a mail stays there until you mark it Done. Messages and mentions in Chat stay in Chat.
- Chat: your team's channels, with how many messages you have not read (Chat with your team: channels and messages). A customer of the base does not have it.
- Files: your base's files (Keep your base’s files in folders).
- Search: one search box over every list, and over your base's conversations and files, that also opens pages and runs actions (Find items with search and filters).
The Inbox, Chat and Files show their own list in the sidebar: your notifications, the channels, the folders. An admin can turn Chat and Files off for the base (Hide the assistant, Chat or Files). At the foot of the rail:
- Builder, for the admins and builders: its sidebar lists All tables, All automations, All workflows, Saved replies and the base's tables, and All tables makes a new table. A table opens on its own pages, such as its fields, its views, its forms and its automations. Others do not see Builder.
- Activity, what happened in the base: Usage, the base's storage, Statistics, what the base did, History, every change to the items, Versions, every change to the base, Online payments, Background jobs, Agent runs, what the agents did by themselves, Held mail and Security log. Each page shows to the roles that may open it: the admins see them all, a builder sees Statistics, History, Versions, Agent runs and Held mail, and a role that takes payments sees Online payments. Others do not see Activity.
- Settings, for everyone, in four groups. Under Personal, your own pages, Profile, Security, Appearance, Notifications and API tokens, the same in every base (Set your theme, time zone and notifications). Under Base, General, the base's settings item (Business details, in the shop), Plan, Modules, Chat, Mail, Secrets and Payments; under People, Users and Roles; under AI, Agents, Skills, MCP servers, Machines and Triage. Each page shows to the roles that may open it. An admin (the admin, in the shop) sees them all; a builder sees Skills, Triage and Agents, where it changes an agent's instructions and skills, and an AI manager agents, skills, MCP servers and machines (Roles and their types: admin, staff and external).
- Your picture, or your initials, opens a menu with your profile, your Bases, where a click opens another base, Install on this device when your browser offers it, Show me around, which plays the tour again (Take the tour of a base), and Sign out (What a base is, and how to switch bases).
Along the top of a base, the path to the page you are on, such as Settings / Users or Settings / Profile (click a step to go back to it), and the Assistant button, which opens the assistant beside the page (Ask the assistant and review its changes).
On a phone the rail and the sidebar fold away: the menu button at the top left opens them both. Tap App, Builder or Settings to see its menu beside the rail, then tap a page to open it; Inbox, Chat, Files and Search open at once.
An item, such as a customer, is added from its list's New button and changed on its own page:
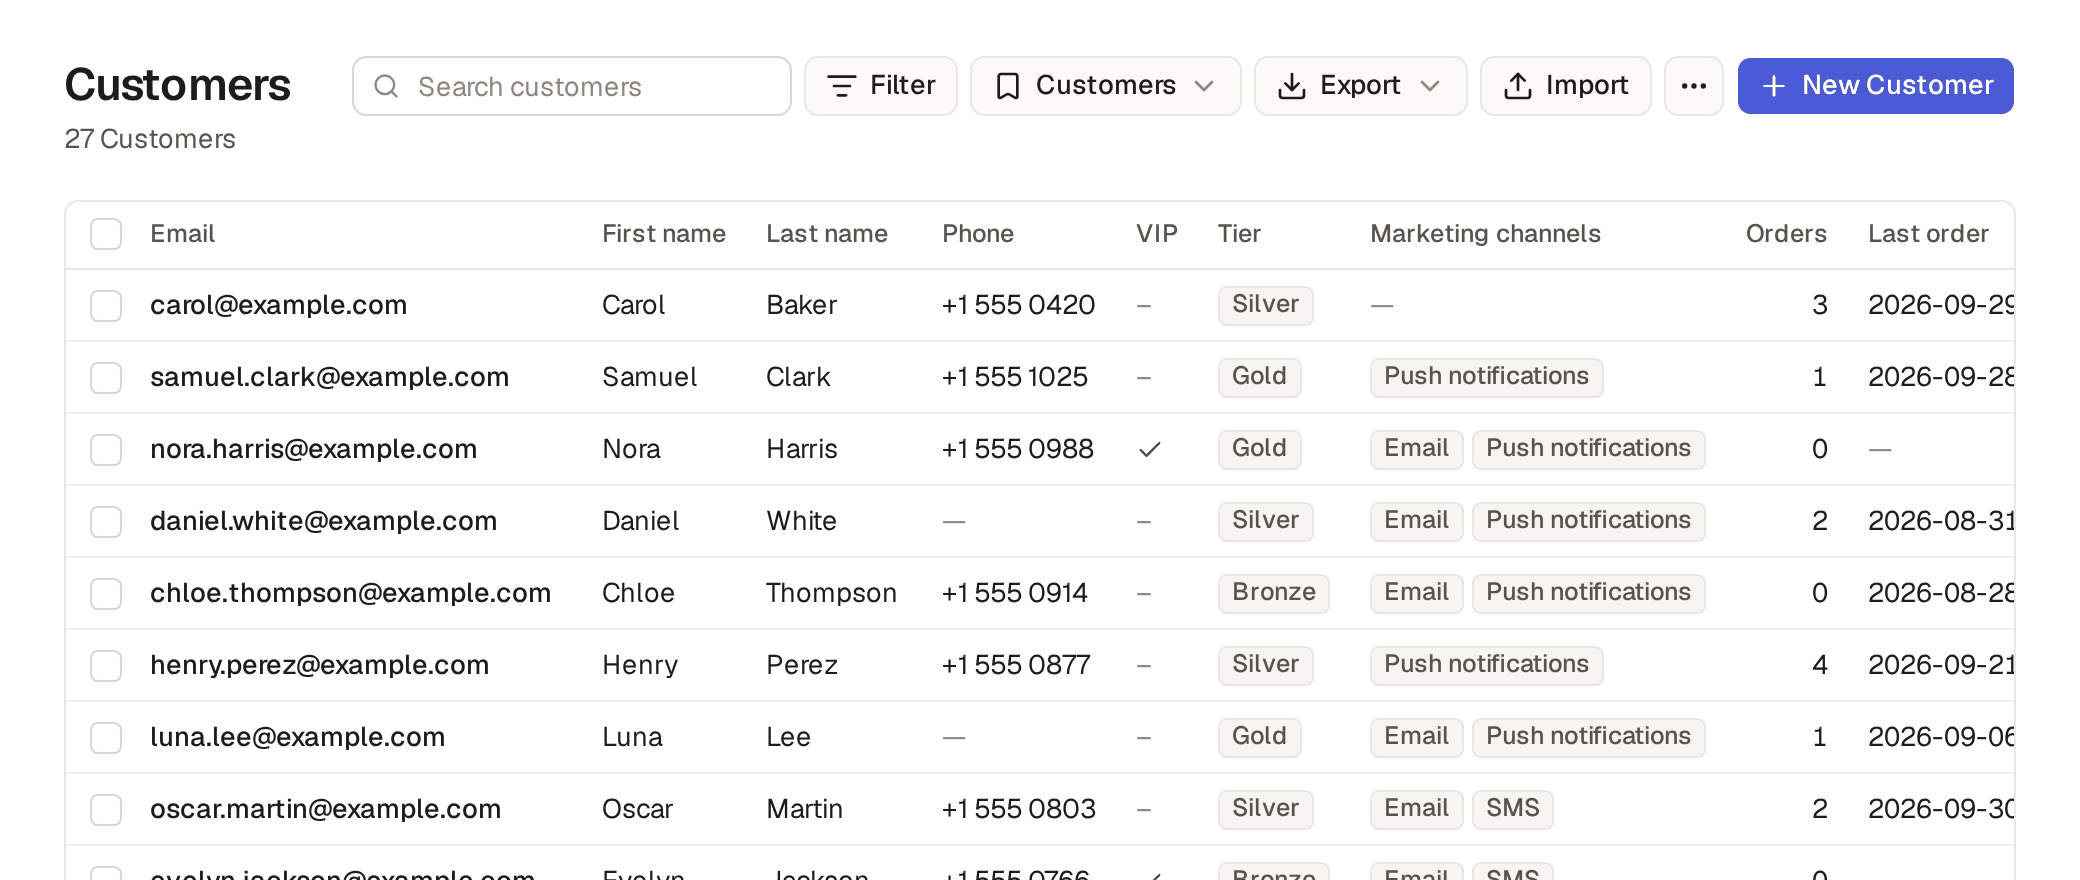
- Click Customers in the sidebar. The page shows how many there are and a grid of them. Click a column's heading to sort by it.
- Click New Customer and fill in the form. A red star marks the fields you must fill in: here First name, Last name, Kind, picked as Person, and Email.
- Click Save, or press Ctrl+Enter. A message at the bottom of the screen says the customer was created, and the customer's own page opens.
- To change the customer, click Edit on that page, change what you need and click Save. A message says the customer was saved.
Below the fields, an item's page lists what belongs to the item, such as a customer's orders, then its comments and its history (Make a table and its fields).
The keyboard shortcuts of a base open pages, move in a list and open, edit and create items without the mouse. Press ? on any page to see them all. Every key, and when the keys do nothing: Use the keyboard shortcuts.