Find items and save views
Find items with search and filters, save a view with its filters and sort, give views to everyone, and show each person their own items.
A list's search box and its Filter narrow the list to the items you look for.
- On a list, type in the search box, Search customers here. The list narrows as you type. Accents and capitals do not matter: muller finds Müller, and stefan finds Ștefan. Words inside an item's Word, Excel and PowerPoint files are found too (Find a file by the words inside it).
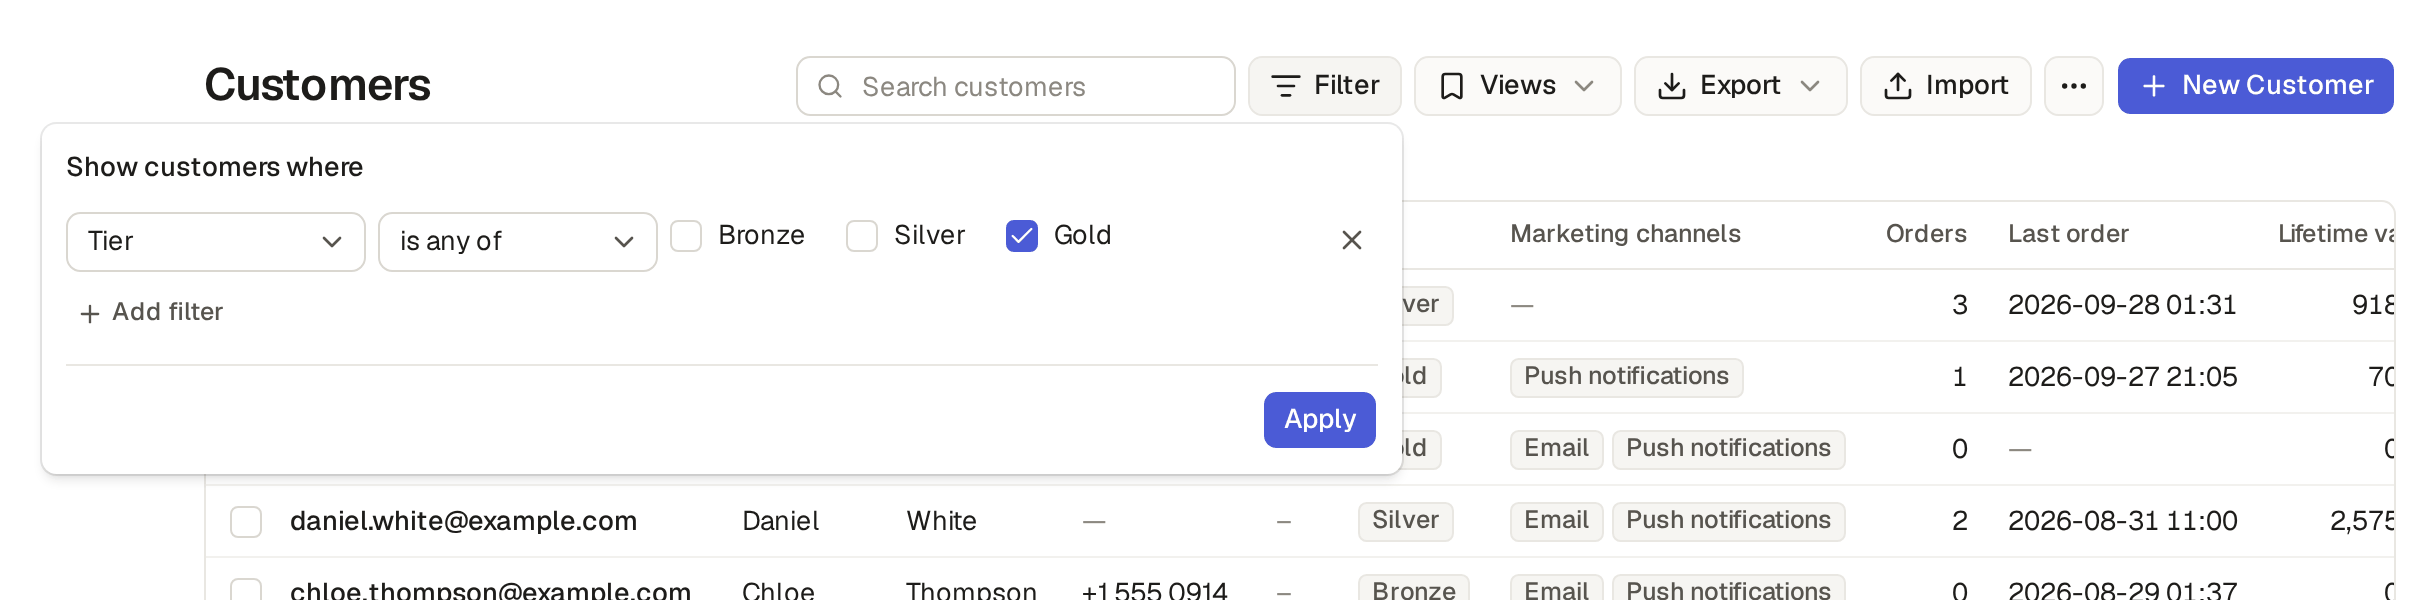
- Click Filter, then Add filter. Pick a field, a condition and a value: for example Tier, is any of, Gold. is not any of keeps the items with none of the values you tick, and those with no value too.
- Click Apply. The list shows only the gold customers, 5 of them, and the filter stays above the grid: its cross removes it, and Clear all removes every filter.
To keep a search, its filters and its columns for later, save them as a view (Save a view of your own).
Search every list at once
- Click Search in the rail, or press Ctrl+K (⌘K on a Mac) or / on any page.
- Type at least two letters, such as blue. The matches show grouped by list, the first five of each: here the products Bluetooth Speaker Mini and Wireless Earbuds Pro, the bill Blue Freight and the orders whose notes mention blue.
- Click one to open its page, or See all in Orders to open the list with the same search in its box.
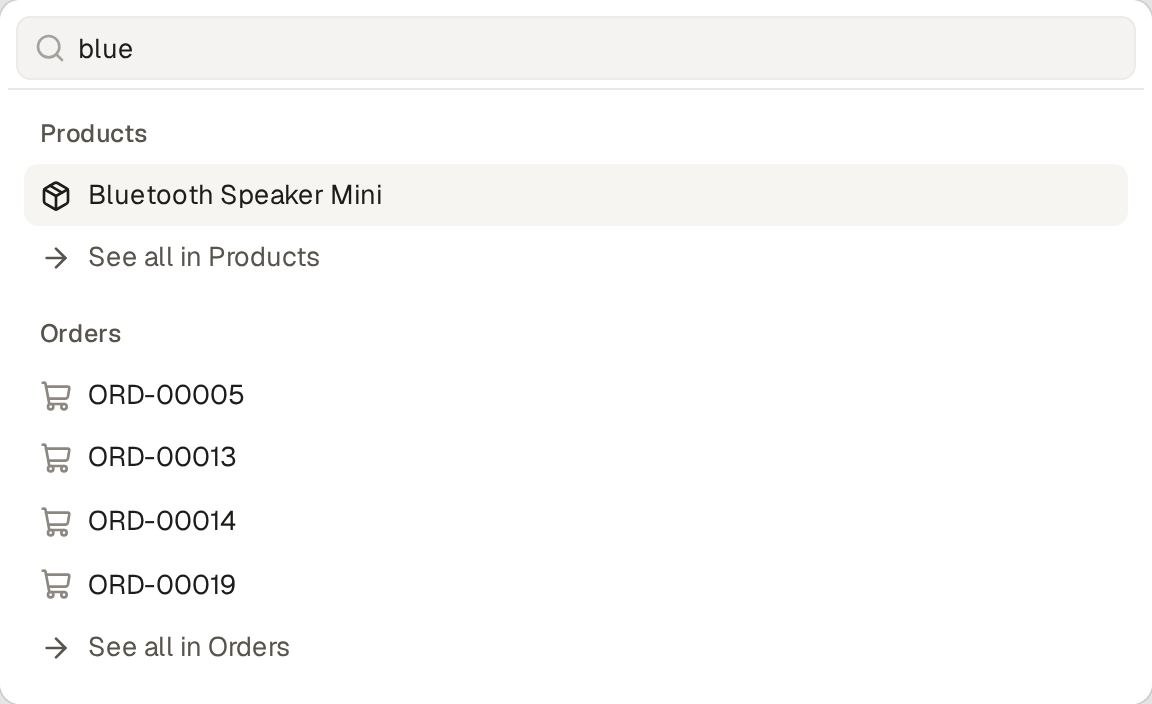
Search looks where each list's own search looks, and finds only what you may see there: a user with only the sales role finds their own orders, not every order. The lists are those of the base you are in only: when the shop and the market both have Products, search in the shop finds the shop's products, never the market's.
Search mail, chat and files
Search also looks beyond the lists. Below them, it shows:
- Notifications: your own, from the Inbox;
- Mail: the mail you may read, open or Done (Get and answer mail in a shared inbox);
- Channels and Messages: the channels you may read, by name, and their messages, your direct messages and group chats included (Chat with your team: channels and messages);
- Files: the files of the Files page you may see.
Click a match to open it: a mail opens in Mail, a channel or a message in Chat, and a file in Files. A customer with an external role, as in the customer portal, and the user of a temporary base search only the base's lists.
Act from the search box
The search box also does things, so you work with the keyboard only. Type a few words, and above the matches it shows what they name; the arrow keys pick one and Enter runs it:
- Go to: each list and view of your sidebar, and each settings page you may open: type settings mail to open the mail settings.
- Create: a new item of each list where you may add one: type new customer to open the new customer form.
- On an item's page, the item's actions you may run, the same as the buttons on the page.
- Switch theme: from light to dark, and back.
- Keyboard shortcuts: a list of the base's keys, which ? also opens.
- Ask the assistant: sends what you typed to the assistant, which opens beside the page and answers.
A saved view keeps a list the way you like it: its filters, its sort, its columns and how it shows. Anyone may save their own views.
- In the sidebar, click Orders. Click Filter, then Add filter: pick Placed at and is after.
- In the date box, choose Start of this month instead of A date. The others are Today, Yesterday, 7 days ago, 30 days ago, Start of this week, Start of last month and Start of this year: the view moves with the calendar, so "this month" stays this month. Click Apply.
- Click a column's heading to sort by it. To sort by several fields, open the Views menu, click Customize… and, under Sort, add a row for each key, in order: a field and its direction, or Manual, the order you drag the items into (Drag items into the order you choose), which comes last. Remove a row, or move it up or down, and click Apply. A column's heading then sorts by that column alone again.
- To pick the columns, open the Views menu and click Customize…. Switch off Use all columns and tick the Columns the list shows, the order's own fields and those of what a reference points at, such as Customer › City (Filter and show columns through a reference). Select all and Deselect all, beside Columns, tick or clear every column at once. Click Apply.
- Open the Views menu: its button, beside Filter, reads the name of the view you are on, Orders here (the view that opens when you click Orders in the sidebar), and Views when the list shows none. Click Save as new view…, give it a Name and click Save view. Only you see the view, with its filters, its sort and its columns.
Find your views
The Views menu lists the base's views under Base views and yours under Your views. Once you change a view of yours, the menu offers Save “This month” and Save as new view…. Your views are in the sidebar too, after the base's views of the same table, and only you see them there.
To hide a view from your sidebar or to delete one of yours, open the Views menu and click Manage views…. It lists the table's views, the base's and yours, each with a switch: if you turn a switch off, the view leaves your sidebar but stays in the Views menu. A number (Show counts and totals above a list) has no switch, since it is never in the sidebar. Click the bin beside a view of yours to delete it: the list does not change. If you hide all the views of a table, the table leaves your sidebar: find it with the search, then open Manage views… again to show its views.
Choose a grid's rows
Open the Views menu and click Customize…. With Show as on Grid, the group Rows, under Use all columns, has the same switches as a view for everyone (Make a view for everyone): Header, Selection, Edit in place, Edit button, Delete button and Scroll sideways. The list follows them at once; Save as new view… or Save “This month” keeps them in a view of yours. A switch the table's pages make useless, such as Delete button when nobody may delete its items, shows off and greyed out.
Limits and details
- Today in a filter is your own day, in the time zone you chose under Settings, Appearance, or in the base's time zone when you keep Base default: the views show the same day that the date picker marks. Automations and the roles' row rules read the base's time zone.
- A grid, a board, a calendar and a timeline take columns, a chart does not: a board's and a calendar's cards show the columns you picked, and a timeline's bar shows them when you point at it.
- A choice field sorts in the order of its options, as its groups do: the orders by status read Pending, Paid, Shipped, Delivered, Cancelled, not by name. A list with no sort shows the newest items first, or the items in their manual order when the table keeps one.
- The base's builders choose whether users may save views of their own of a table: in Builder, the table's List items page has the switch Users' own views, on at first. If they turn it off, nobody saves a view of their own of that table, in the base, through the API or through the assistant, and the views already saved are hidden, not deleted: they come back when it is on again. Customize… still changes how the list shows, rows too, but nothing is saved.
A view for everyone is a view on a table's Views page in Builder, and it is in the sidebar. Making one is for the base's builders.
- Click Builder, then the table, such as Orders, then Views, then New view.
- Give it a Name and pick how it shows under Show as: a grid, a board, a calendar, a timeline (Show items on a timeline (Gantt chart)) or a chart. A grid can also Group by a field (Group a grid’s rows, with subtotals); a chart takes what it draws (Draw a list as a chart), and a number is a chart that shows one number as a tile (Show counts and totals above a list).
- Add its Filters and its Sort: a row for each key, in order, each a field and its direction, or Manual last. Add, remove and reorder the rows as in Customize… (Save a view of your own); with no row, the view keeps the list's default order.
- Leave Use all columns on for the table's list columns, as its List items page sets them. Or switch it off and tick the Columns the view shows: with none ticked, saving is refused with "Choose at least one column". The columns include the fields of what a reference points at, such as Customer › City (Filter and show columns through a reference).
- For a grid, choose what its rows have, a switch each: Header, the grid's header row; Selection, the ticks to act on several items at once (Change or delete many items at once); Edit in place, to change a value in its cell (Change a value right in the grid); Edit button and Delete button, each row's buttons; Scroll sideways, to show all the columns of a grid that is wider than the page, and scroll to see them. So one grid of a table may be for looking and another for working. A board, a calendar, a timeline and a chart have none of these.
- Switch on Show on the dashboard for a card on everyone's Dashboard, with the count, the totals and the first five items, for everyone who may see that list. The items show up to three columns, each under its title. A chart's card shows its chart and its total, and a number's shows its tile.
- When the table already has another view, switch on Default to make this one the table's default view (Choose a table’s default view). A user of an external role sees only the default view (Open a customer portal).
- Click Save view. The view applies at once, without pausing the base.
The shop's Dashboard shows its views Unpaid, Low margin, Today and Overdue this way, and Orders per month as its bars and New orders as its tile, then every list with how many items it holds. Each person's cards count only what they may see.
A view for everyone can be kept for some roles only: tick them under Roles on the view's page in Builder. Only the users with one of those roles see the view: in the sidebar, in the list's Views menu, on the Dashboard, through the API and through the assistant. With no role ticked, every user sees it.
- The base's builders see every view, so they can always find and change one.
- Roles keep a list that is always empty for a role out of its menu, such as a gym's Goods and Services for its front desk; they do not protect the items. Each role still reads the items its row rules let it (Choose the rows a role sees and changes), through the table's other views and the API.
A table's default view is the one that opens wherever a link names no view, such as a reference to an order, a related list, the path along the top, the Dashboard's counts and the table's own line in the sidebar. Each table with a view has one. The base's builders choose it.
- Open the view from the table's Views page in Builder.
- Switch on Default and save: the table's other views lose it.
- Until you pick one, a table's first view is its default.
- A number view is never the default: the first view that is not a number is.
- The default view's own switch is on and cannot be turned off; make another view the default instead.
- With two views or more, the Views page marks the default one with a Default badge.
Through the API, the same is "default": true on put_view, and the assistant does it when you
ask.
To change a view for everyone, open it from the table's Views page in Builder. To delete it, click Delete on its page and confirm.
- The view a table came with can be changed, renamed and deleted like the others, its last one too. Deleting a table deletes its views.
A table with no view
A table with no view for everyone stays in the sidebar, as a link to its list, which opens your first view of your own of it. When you have none either, the list reads "Categories have no view yet": no items, no count, no search, no Filter, Export or Import, but the Views menu and the button for a new item, such as New Category, stay. While the table's Users' own views is on, a line says "Save a view of your own from the Views menu above". The base's builders also get the button New view, which opens a new view for everyone on the table's Views page.
A filter on Me shows each person their own items with one view: on a field that points at the base's users, such as an order's Sales rep, Me is whoever opens the list.
- On the Orders list, click Filter, then Add filter, and pick Sales rep and is.
- In the value, choose Me instead of Someone, which picks a person. With is any of, tick Me beside the users you pick. Click Apply: the filter reads "Sales rep is Me".
- Save it from the Views menu, or make it a view for everyone on the table's Views page in Builder.
The shop has one ready, My orders, under Orders in the sidebar: Jane sees the orders she is the sales rep of, Mark his, and neither sees the other's.
Me also works one step through a reference to someone who signs in. In the Shifts app, a shift's Person is a person on the staff, whose Signs in as is the user that person signs in as: pick Person › Signs in as, is and Me, and the list shows each person their own shifts. Its view My shifts is this one.
- Me is always the person reading, never the one who saved the view.
- An automation on a schedule has nobody reading, so there a filter on Me matches no item.
- Ask the assistant for "a view My orders" and it makes one view for everyone, not one per person.
A filter or a column can reach into the item a reference points at, such as an order's customer's city.
- On the Orders list, click Filter, then Add filter. After the order's own fields, the list offers its customer's, such as Customer › City. Pick it, is, and type Austin. Click Apply: only the orders of customers in Austin, and their total.
- For a column, open the Views menu, click Customize…, switch off Use all columns and tick Customer › City under Columns, then save the view to keep it (Save a view of your own). For everyone's view, do the same on the table's Views page in Builder: switch off Use all columns and tick it among the Columns (Make a view for everyone).
The shop's My orders shows each order's customer's city this way.
- A filter or a column through a reference reaches one step, never two, and such a column is not sorted or grouped by.
- What it reaches keeps its rules: a field you may not see there is not offered, and an order whose customer you may not see matches no such filter and shows that column empty.
- To show the customer's value on the order's page and form too, and sort and group by it, make it a lookup field (Show a field of a linked item with a lookup).
A list's filters all hold at once; an Any of group takes the items that meet one of several conditions: the paid orders that are over 500 or come from customers in Columbus. The example shop's view Paid: big or local is this one.
- On the Orders list, click Filter, then Add filter: Status, is, Paid.
- Click Add any of. The Any of group opens with two ways an order may match, joined by "or". In the first, pick Total, is more than, 500; in the second, Customer › City, is, Columbus. Add condition adds a condition to a way, which then must all hold together, and Or… adds another way.
- Click Apply. The chip reads the group in words, "Total is more than 500 or Customer › City is Columbus", and the list holds the paid orders that meet one of them.
Save it as a view from the Views menu, or add the same group to a view for everyone on the table's Views page in Builder.
- A group holds conditions only, not another group.
- A group never shows more than you may see.
- Scripts with an API token, AI clients and the assistant filter the same way.